 |
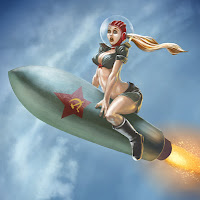
Here’s a picture I did for ImagineFX’s weekly illustration challenge. The theme this week was “Rocketgirl Rita, the quintessential 50’s sci-fi pinup girl.” Despite being well received, I think my entry strayed a bit from the theme, but what the hey.
 |
| Fig. 1: Rough thumbnail |
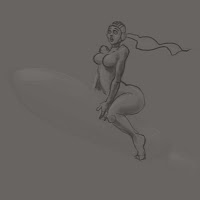
Because I like pinups to be both funny and sexy, I hit on the idea of a girl helplessly riding a rocket into space. So I scrawled the idea down. (Fig. 1)
 |
| Fig. 2: Refining the pose. |
Next I pushed the initial sketch back to about 20% and worked on top, refining the pose a bit. (Fig. 2) I was trying to sell the idea of her hanging on to the rocket, and express some anxiety about falling off.
 |
| Fig. 3: Preliminary color |
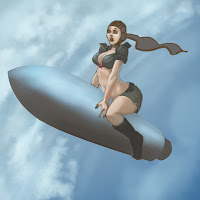
After that, I started refining the anatomy and adding some preliminary color. (Fig. 3) This can be a tough stage, trying to get some colors that work together, but in this case it seemed pretty simple: I knew I wanted a military green for her clothes, with some red accents, and a sky background. I also trimmed her badonk a bit, because it was looking just too massive. I also made her arms straighter, increasing the tension of the pose. I found this helped make her look like she is trying to hang on, rather than just riding the rocket.
 |
| Fig. 4: Clouds. |
Next (Fig. 4) I added some clouds on a masked layer, using two different cloud brushes. I basically ran them in a diagonal, then used a distortion filter to make them look like they are curving off along the Earth’s horizon. I also put some shine to the rocket, again using a masked layer to keep the edges crisp even while using huge Overlay strokes. The Overlay brush mode does really cool things with colors, and I got a nice sheen to the rocket this way. I also perked up her left breast a bit.
 |
| Fig. 5: Rocket exhaust |
After that I added some modeling to her clothes and hair, and began building up the rocket’s fiery exhaust. (Fig. 5) For that I used a brush comprised of random-looking dots, building up in several layers in various modes (Overlay & Screen mostly). I hit the resulting dots with a motion blur filter, and did that a few times, building up color & layering.
 |
| Fig. 6: Textures & details. |
Next (Fig. 6) I added some more highlights from the sky, and hit her with the glow from the engine. I also put a nice radial gradient glow around the flames, again set to Overlay, and added a texture overlay to the rocket. In addition to coloring the helmet and adding the dome, I vignetted the entire piece by using a blue color fill layer set to Multiply, then knocked down the opacity and masked off the center with a radial gradient on a mask. I feel like this really helped tie together all the colors & elements in the picture, reinforcing the focus on the subject.
To finish up, I knocked back some of the rocket texture because it was reading more sharp than anything else in the picture — too photographic. I also softened the rocket’s edges and added the stars & reflections on the helmet. Also, someone suggested I make her hair on the same angle as the rocket exhaust — a great idea, since the color I chose for her hair was meant to emulate the fiery rocket color. A bit more color saturation and level adjustment and I called it done.
Hi Could you explain better the phrase about image 4
"I also put some shine to the rocket, again using a masked layer to keep the edges crisp even while using huge Overlay strokes"
I'm not getting what you did with masks.
Bye!
Carlo Valente
Hi Carlo:
Sure! First I created new layer. Then on that layer, I created a mask, using the shape of the rocket. The mask made sure I wouldn't be able to color outside the rocket's shape. Then on that masked layer, I was able to use a very large, low opacity brush set to Overlay mode to paint some shine on the rocket. Because of the mask, I didn't need to worry about "coloring outside the lines".
Using brush modes is a great way to create some interesting color effects. I use Overlay mode sometimes (like above), but my favorite is Screen mode, which is fantastic for building up sharper highlights.
That' s funny 🙂 Thanx for sharing!